Posts filed under Mechanical Keyboards

The OLKB Planck Keyboard Review

The OLKB Planck Keyboard Review

(Jeff Abbott is a regular contributor at The Pen Addict. You can find more from Jeff online at Draft Evolution and Twitter.)

Whenever I want a change of scenery from the stationery world, I find solace in the world of mechanical keyboards. It has the same level of customization, nerdery, and community, but with keyboards and firmware instead of pens and ink. In a previous post, I went through my history with various types of keyboards. In this post, I want to dive a little deeper into one of my all-time favorite keyboards, and one that I consider an excellent and accessible introduction into the more customizable genre of keyboards — something you can really make your own, and something that can launch you into a complete sub-genre of intriguing keyboard designs and tangent skillsets.

OLKB Planck Keyboard Comparison

Fellow nerds, allow me to introduce you to the OLKB Planck. The Planck is a tiny keyboard that introduces several alternative concepts to challenge your traditional ideas of what defines a keyboard. To give you a general idea, here's a quick list of what the Planck is:
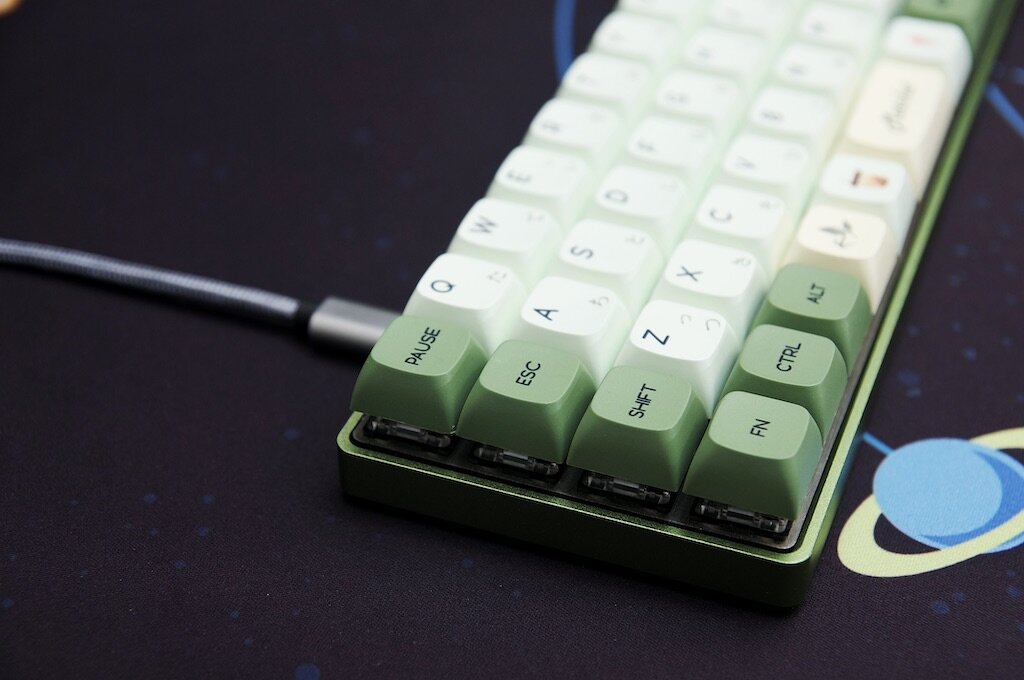
  • Ortholinear layout
  • Every switch is fully programmable
  • 40% size — comfortable but portable
  • Excellent construction
  • Available as a kit or fully assembled
  • Foundation for custom keyboards
The OLKB Planck Keyboard

Ortholinear

Let's get into each of these ideas, starting with the ortholinear layout. This means that the keys are arranged in a grid of straight rows and columns instead of the traditional staggered layout of the standard keyboard. It certainly looks weird compared to what you're used to, and it also takes a bit of time to grow accustomed to while typing as well. For me at least, I don't enjoy going back to the staggered layout because my fingers are faster on the ortholinear layout. In simple terms, consider how your fingers work best. They're really good at moving up and down in a straight line, but moving from side to side is a secondary function. I'm not here to say if this layout is clinically better for your fingers, but I can tell you that I find it more comfortable and natural.

Programmable

OLKB Planck Keyboard Keys

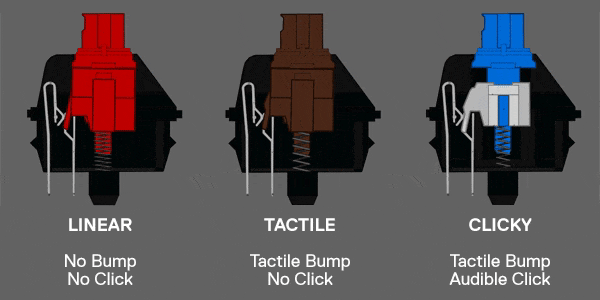
What's the deal with programming each switch on your keyboard? Well, with a standard keyboard it isn't a big deal, but it becomes more important when you start reducing the number of switches/keys on the keyboard. Accessing keys like numbers and symbols now involves using a "layer" — similar to how the Shift key works to produce a lower or upper case letter or different symbols. Maybe you use square brackets more than most people, or maybe you want the page up and page down keys in a different place that is more comfortable for your fingers. Just because you can program every switch and layer of a keyboard doesn't mean you have to. In fact, I didn't change anything about my Planck for almost a year of full-time use. Finally, when I did decide to change something, I only changed two keys — but that freedom to put those two keys exactly where I want is an addictive concept. The tool that the Planck uses to accomplish this is the QMK firmware, but we won't get into that just yet.

QMK Configurator

Want to learn a new typing layout besides the standard QWERTY? With the Planck, you can switch back and forth between QWERTY, DVORAK, and COLEMAK with the press of a button. If you want to learn another layout (like WORKMAN), you can add it with the QMK firmware. If you need to switch between different regional keyboards (like UK English and German) with slightly different layouts, you can do that too — all with the same keyboard.

And all of this customization lives on the keyboard, so that means that whatever computer you plug it into, your keyboard works exactly as you expect. You don't have to customize any software on the computer or select different keyboard or region layouts from a menu. It's plug and play, baby!

40% Club

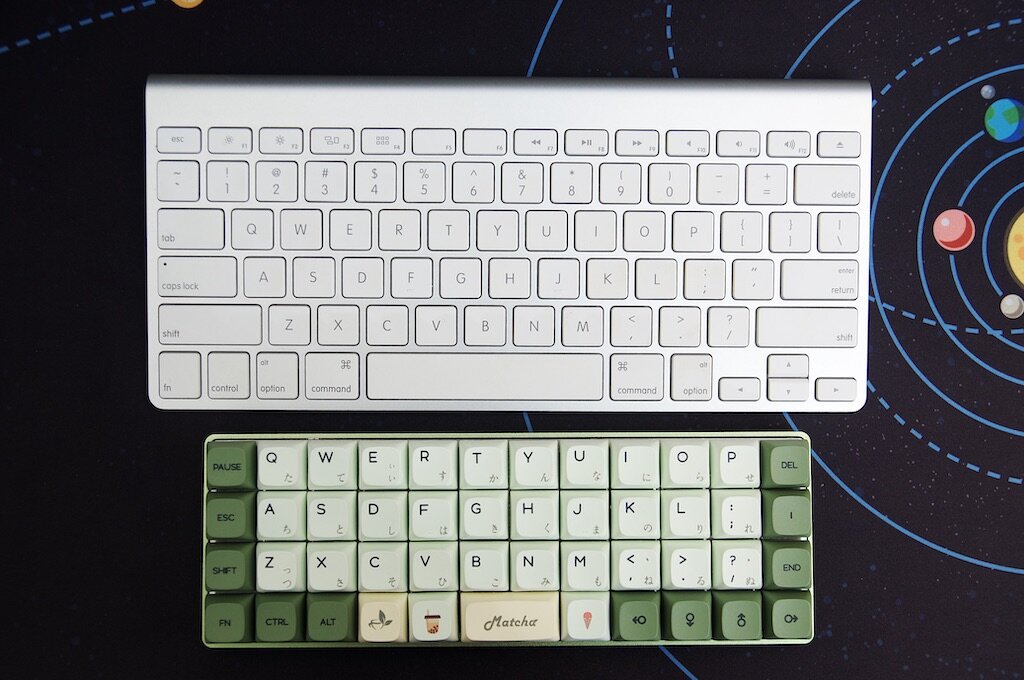
It's almost comical how small this keyboard is compared to a standard full-sized keyboard. You could probably fit four or five Planck's into the footprint of a normal keyboard. It's even small compared to minimal Bluetooth keyboards like Apple's Magic Keyboard or the popular Logitech K380. Despite its size, I'd argue it's far more capable and powerful if you utilize all the features it offers. Certainly, you will spend around two weeks getting accustomed to this keyboard and retraining your brain and fingers on where all the different keys live. It is frustrating in the short term, but the long-term gains are so worth it. Plus, creating new pathways in your gray matter is a good thing! Keep that neural elasticity active to keep your brain healthy! Learning new muscle memory is an excellent way to exercise your mind.

OLKB Planck Keyboard Size

Build Quality

when you start looking into mechanical keyboards, it's obvious pretty quickly that your budget starts in the $100 range for a good product. At this range, you'll likely get a plastic keyboard with reputable switches and a nice keycap set. You'll likely only be able to change a small handful of switches (like Win and Alt for Windows or macOS users), and the layout options are pretty much the same — some variation of tenkeyless, 60% or 65%.

OLKB Planck Keyboard Caps

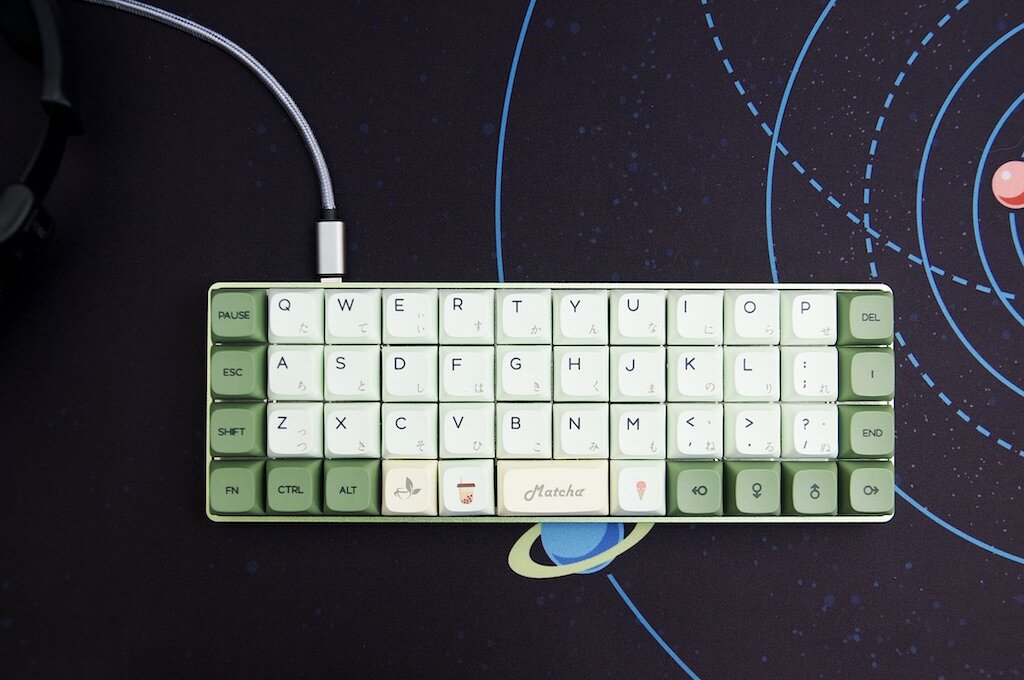
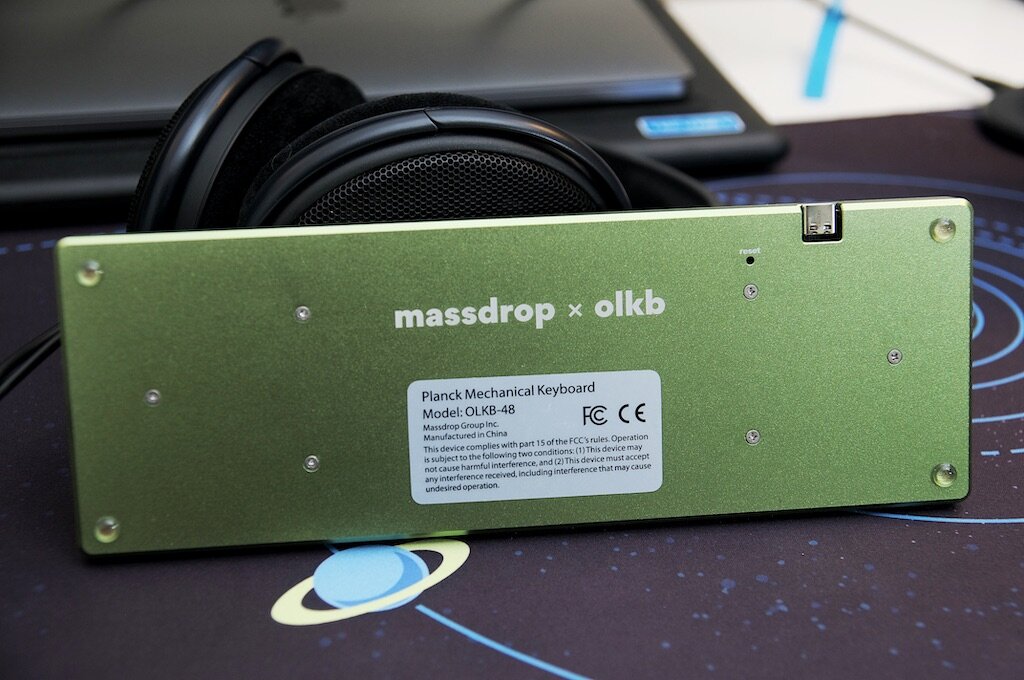
With the Planck, you get the PCB that includes hot-swappable switch seats, a steel switch plate to mount the switches, and an aluminum case milled from a single piece of metal. The Planck is solid and will outlive you if you treat it right. You can purchase a Planck and easily change out the switches if you want to try something new, which can totally transform the keyboard for around 30-40 bucks. You can also customize the firmware exactly how you want, and it can grow with you as you learn more and your needs change.

Where Can I Get One?

While I recognize the Planck isn't for everyone, you'll probably know by now whether it has piqued your interest or not. In that case, how do you get one? Well, there are a few answers that depend on whether you want a fully assembled keyboard or if you prefer to do some light assembly.

The Planck was designed by Jack Humbert, owner of the OLKB company and founder of the QMK firmware. The Planck is always listed on the OLKB website, but it's rarely in stock. Rather, there are two main routes to go if you want to purchase a Planck.

OLKB Planck Keyboard Drop

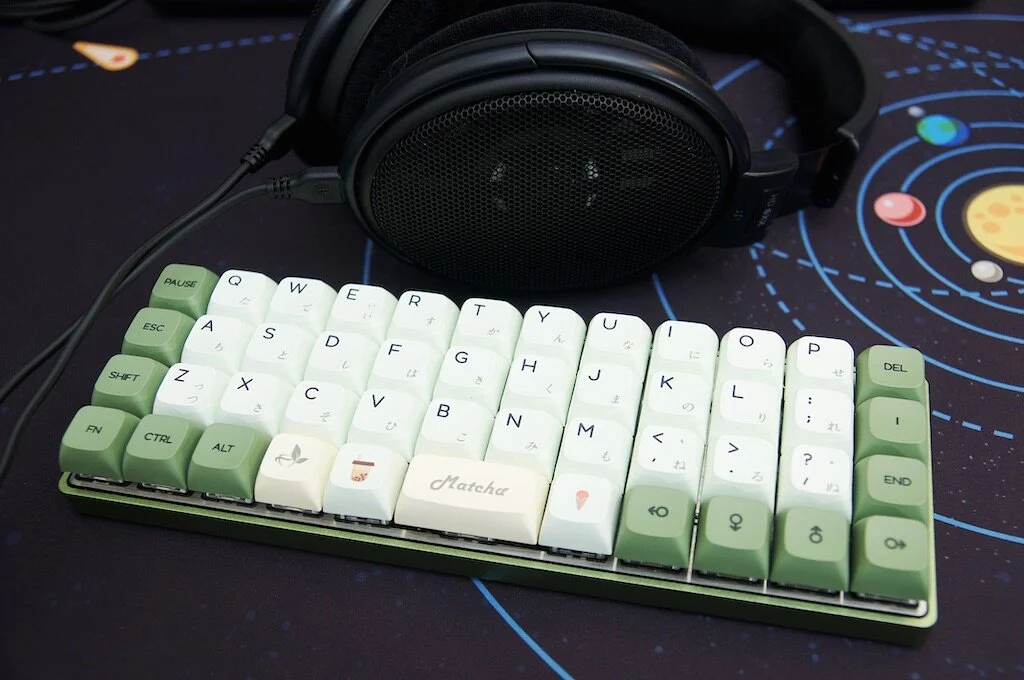
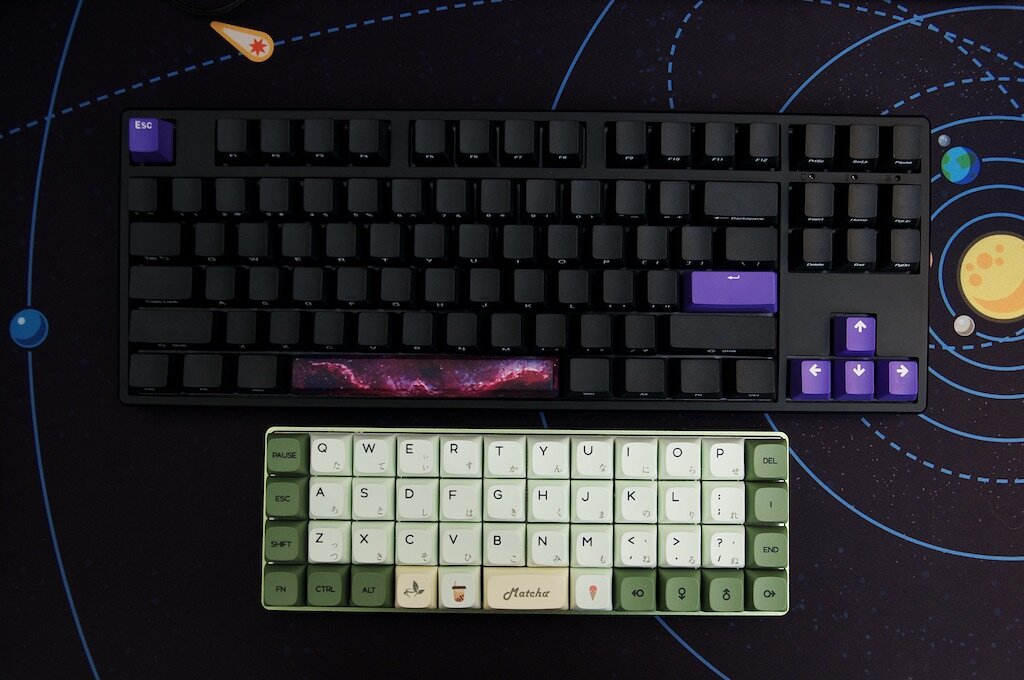
Drop.com: Drop usually has the Planck available as a group buy kit that you can sign up for. Currently, you can purchase a Planck kit that includes everything you need except for the switches. There are many, many places to buy key switches from, and it's best to find a retailer that you like that is based in your home country. You can expect to spend at least $30 on switches, so don't forget to factor that in to your overall budget. You can choose to add on the attractive Acute keycap set from Drop, or you can find your own — again, from any number of retailers. Once the kit arrives, you simply follow the directions to install the PCB and plate into the case with a few screws, and then you plug in all the switches and top them with the keycaps you chose. I'd compare this activity to building Lego — no soldering! All this for roughly $160 depending on your switch and keycap choices. For anyone interested, the keycaps in my photos are from Amazon and are the Japanese variety.

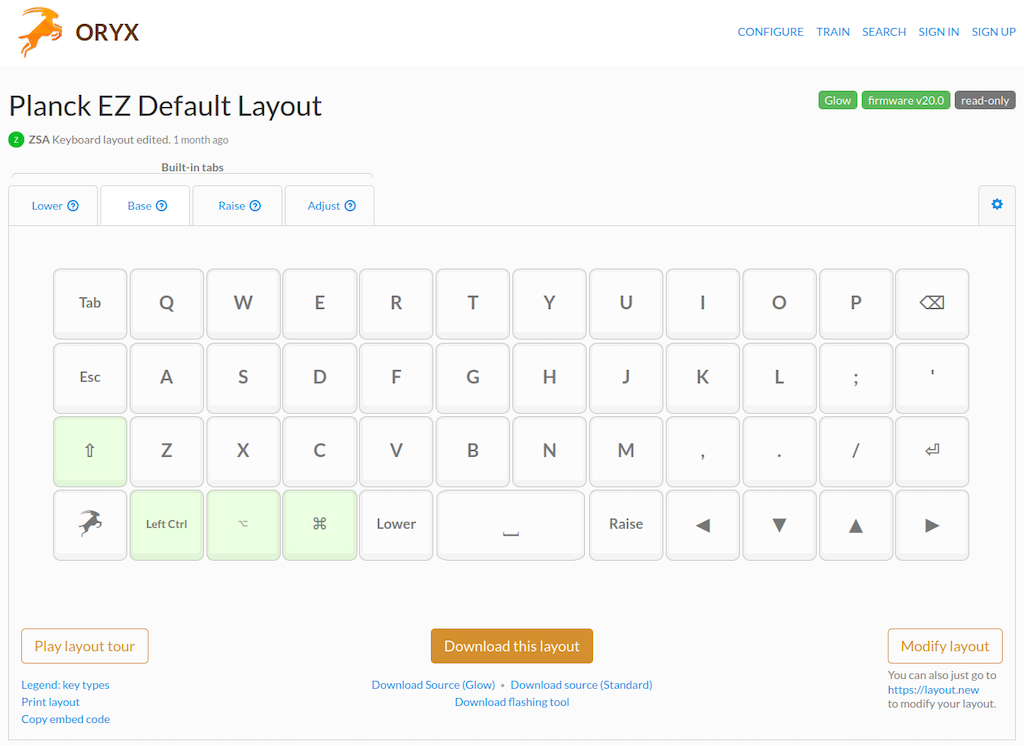
Planck EZ: You might have seen the ErgoDox keyboard before — it's a weirdly shaped split keyboard that features an ortholinear layout with a "thumb cluster" of switches for each thumb. Definitely not a keyboard for the "ortho curious," but they also sell their version of the Planck. While different from the Drop version, you get the same PCB and functionality in a fully built keyboard. When it shows up at your door, you open the packaging, plug in the keyboard, and start typing immediately. This is an excellent option if you aren't interested in choosing case color, keycaps, and sourcing your own switches. The Planck EZ comes in two colors, has some great switch options (I'm really partial to the Kailh Box variety), and also includes key backlighting. These start at $230 with free shipping, but I'd highly recommend spending the extra $15 for the LED backlighting. With this option, you also get a 2-year warranty in case anything goes wrong. ErgoDox also has their own fork of QMK (called Oryx) that is really easy to use, making it a simple task to customize your layout and install it to your keyboard.

ORYX Configurator

Is It For You?

Ultimately, I understand this is a keyboard that only a small percentage of people will be interested in, but it's worth the exposure for anyone that can appreciate the design and attention to detail that makes these products and communities possible. The Planck has so many parallels to the custom / builder style of pen in our stationery realm, and it's always encouraging to see people expressing themselves through these different outlets that also allow us to build caring and thoughtful communities.

Bottom line for me: if you're interested in ortholinear layouts, the Planck is the best option to get started. It's accessible and easily available, whereas many of the other options are either too different from the standard keyboard, too expensive, or require too much experience with soldering and troubleshooting.

OLKB Planck Keyboard vs Full

If you want to save a few bucks and think it would be fun to put your own keyboard together, the Drop option is excellent. If you'd rather buy the keyboard and get going immediately, the Planck EZ is a great pick. They're essentially the same keyboard, so you can't go wrong with either.

P.S.: If you want an even milder introduction to the ortholinear layout, check out the OLKB Preonic! It's the same layout as the Planck except it has one extra row of keys on top for all the numbers. This one is only available on Drop, but worth checking out if you really want those dedicated number keys.


Enjoy reading The Pen Addict? Then consider becoming a member to receive additional weekly content, giveaways, and discounts in The Pen Addict shop. Plus, you support me and the site directly, for which I am very grateful.

Membership starts at just $5/month, with a discounted annual option available. To find out more about membership click here and join us!

OLKB Planck Keyboard Phone
Posted on May 19, 2021 and filed under Mechanical Keyboards.

My Journey Through the Mechanical Keyboard World So Far

(Jeff Abbott is a regular contributor at The Pen Addict. You can find more from Jeff online at Draft Evolution and Twitter.)

As I've mentioned in a couple of otherposts, the world of stationery and fountain pens is not an enigma. There are plenty of other vibrant, niche communities out there, and I'm sure many of us are part of them as well. What makes stationery so much fun is the ability to customize and individualize things and then share them with other like-minded individuals who also enjoy the same things. In other cases, it's really interesting and mind-opening to learn more about a system or product that someone loves even if you're not interested in it for yourself. In so many ways, it's the same attractions that I've found in the world of mechanical keyboards.

In the same way that most people who discover the vast world of stationery have no idea what they like at the beginning, keyboards are similar. You have to jump in to try things out and make mistakes before you start to hone in on what really captures your interest. And, well, after you find that, you're done for! I alluded to this in the past, but most people don't go from deciding to try a mechanical keyboard and land on custom building their own and using custom firmware to control it. No — most people start at whatever seems the most accessible to them, which is likely something that looks familiar. This is exactly how I got into the keyboard hobby, and I thought it might be interesting to see my path along different keyboards while I really discovered what I liked.

Before I start into my personal journey, you should also know I had some specific needs and interests. This started off as some mild (but annoying) wrist pain that developed about a year after I started a full-time desk job that involved lots of typing. A couple of my coworkers used those monstrosities offered by Microsoft, and I just didn't want to deal with that eyesore on my desk. After another year or two, the intense dislike for the aesthetic wore down as my wrists continued to complain, and I went ahead and purchased a Microsoft Natural Ergonomic 4000 in mid-2012. And that's where this journey starts for me — in an attempt to alleviate a blooming RSI situation and to prevent any further damage.

The Beast: Microsoft Natural Ergonomic 4000

I honestly don't remember how much I paid for this keyboard. I purchased it at an Office Max on my lunch break and viewed the whole thing with about as much excitement as someone purchasing a back or ankle brace from the pharmacy. Like many people who tried this keyboard back in the day, it took me at least a week or two to really get used to the slightly different layout of the keys. I didn't like the mushy feel of the keys, and that never changed. But, I did start to feel a lot more comfortable, and my wrist pain was pretty much gone after a few months of using this keyboard.

But, I'm a vain person and this eyesore just didn't belong on my desk. Unfortunately, there weren't many options in those days that looked any better. I decided to bear with it and be happy that my wrists were doing better — until I discovered mechanical keyboards.

CoolerMaster Quick Fire

CoolerMaster Quick Fire

After looking up mechanical keyboards to understand what they meant (because aren't all keyboards mechanical??), I quickly dismissed them due to the pretentious and expensive stigma that comes with new things that you know nothing about. After reading and listening to people talk about how these keyboards differ from the widely-available options we're all used to, I become more and more intrigued. In mid-2013, I bit the bullet and purchased a CoolerMaster Quick Fire Rapid with MX Cherry Blue switches. This tenkeyless model was so much smaller than that massive ergonomic board, and the switches were so SATISFYING. This is where I knew I was a goner. In almost no time, I took this keyboard to work as my main workhouse, keeping the ergonomic keyboard in a drawer in case any RSI issues flared up. If any of my coworkers from that job happen to be reading this: I'm really sorry for what I put you all through. That keyboard sounded like a metallic machine gun, and my job required lots of typing. But the keys felt so good. So tactile and crisp. In the same way that I love writing with a perfectly tuned nib and a smooth ink that lays down crisp lines on the page.

After moving to a different job where I worked 99% remotely, I quickly discovered that my beloved MX Cherry Blues just weren't going to cut it since I was on calls for at least half of my day. I didn't want to be "that guy" being called out for typing too loud, so I looked for other options.

Microsoft Sculpt Ergo

Microsoft Sculpt Ergo

Between the time that I retired the Ergonomic 4000 and mid-2014, Microsoft had released a redesigned and modernized version of their ergonomic keyboard: the Sculpt Ergo. I picked one up because I knew it would be quiet enough for being on calls, and the ergonomic comfort was too good pass up. That keyboard is still one of my favorites, scissor-switch keys and all. I used that for several years and still get it out every now and again. It's comfortable, wireless, and just an overall great keyboard. The only downside is the weird function key toggle switch. I used this keyboard for several years before making a choice to try a new category: mechanical ergonomic keyboards.

Matias Ergo Pro

Matias Ergo Pro

In recent years, the mechanical keyboard market was gaining more traction with all the increased buzz and popularity. This was great because it meant more people were creating new and interesting products (very similar to the custom fountain pen world!), and I decided to take a shot with the Matias Ergo Pro. I bought this directly from Matias and fell in love with it almost immediately. The key switches were quiet enough for calls, the board was split in two so my wrists could stay happy, and it was just so nice to type on. The ability to tent the halves so that my wrists weren't perpendicular to the table top was so helpful.

It was fantastic...until it wasn't. About six months in, the space key started repeating itself. After searching for this issue, I quickly learned that it's referred to as "key chatter" and isn't unheard of with mechanical key switches. Quality issues happen, right? Matias was quick to respond, and they sent me a completely new keyboard free of charge. They had apparently used a bad batch of switches and didn't catch it before they shipped out. Great! Another six months, and now the 'b' and 's' keys started chattering on this new board. Once again, Matias was fantastic and sent me another keyboard half to fix the issue. On the last month of the year-long warranty, yet another key stopped working, and Matias shipped me yet another keyboard, free of charge.

Another couple of key switches failed, but since the keyboard was no longer under warranty, I took matters into my own hands. I learned about circuit boards and soldering, and practiced removing switches from one of the extra Matias keyboards. By cannibalizing the other keyboard parts, I was able to replace problematic keys in a matter of an hour or two. After replacing about 3 or 4 switches, I've never had any problems with it since! And, by fixing other issues with other switches, I now have two complete keyboards, plus an extra half of one with plenty of good switches on it. Yay!

I never hesitate to recommend Matias when someone asks. They were so helpful and I really believe the make excellent products. Every company gets hit by unexpected quality issues, and it's how they respond that really counts. Matias makes their own switches (they are modeled after the old ALPS switches), and they completely owned the problem and sent me replacement parts for no charge. In my book, they went above and beyond and I'd happily buy more of their products and recommend people to them. But, my appetite for trying more keyboards and switches continued to grow.

Ducky One Side Print TKL

Ducky One Side Print TKL

I'd been hearing a lot about how great MX Cherry Clear switches were from several people in my circles, and I decided to give them a try. I didn't love the Ducky One TKL design, but it was affordable and a good option for trying out a new keyswitch. I ordered this from MechanicalKeyboards.com and was really excited to start using it when it arrived. Unfortunately, I discovered after a few weeks that the extra force required to press these keys, plus the old straight layout, caused my RSI to flair up. Back to the Matias! Besides that, the Ducky One is a solid keyboard that I'd whole-heartedly recommend as a starter keyboard. They offer a large selection of switch options and fantastic build quality. They even come with some purple accent keys! The space-theme space bar you see on mine is something I ordered from Drop.com back in 2018.

OLKB Planck

OLKB Planck

The OLKB Planck is when things started to get serious between myself and mechanical keyboards. This is my "point of no return," and I regret nothing. After being on Massdrop for 3 years and buying nothing, this keyboard was my first purchase from them. When I bought it in late 2018, the estimated arrival date was April 2019. After a short manufacturing delay, I received the kit in June 2019. That's right — this keyboard was a kit! Everything I needed was included, and the PCB was already outfitted with "hot swap" sockets so that no soldering was needed. After a couple of hours of snapping and screwing everything into place, I had a working keyboard. It was such an enjoyable experience, and I could tell I was hooked because I was already planning my next build only hours after finishing this one.

The green aluminum case and modern key caps on this keyboard just make my day when I look at it. I went with Gateron Brown switches with this board, and couldn't be happier. I also learned what a difference it makes in how a keyboard feels whether it uses a plastic versus metal switch plate. In my case, the Planck uses a stainless steel plate, giving this thing an incredibly sturdy feel and dense sound.

The other main selling point of this keyboard was the unique layout — "ortholinear." The way they explain this layout is simple. Our fingers are better at going up and down in straight lines instead of also moving left and right slightly to hit keys. There are also plenty of anecdotes about the staggered layout that you find on any standard keyboard as coming from the typewriter days, but I'm not sure how much of that is true or even relevant. What I can tell you from my own personal experience is that the ortholinear layout is so much better for my use. I'm never going back to an external keyboard that uses the standard staggered layout — at least not for very long.

Magicforce 82-key V2

Magicforce 82-key V2

The Magicforce 82-key might be the closest thing I have to an "impulse buy" in terms of keyboards. The layout of this keyboard is similar to the popular Vortex Race 3 and Keychron K2, but at a slight discount (at least to the Race 3). I purchased this keyboard with MX Cherry Browns since I didn't own any keyboards with these switches yet. If I'd known how much I would love the Planck, I wouldn't have bought this keyboard. It's a great starter keyboard, and the layout is nice for a small footprint without sacrificing the dedicated function keys. If you're brand new to mechanical keyboards, it's still easier to recommend the Magicforce 68-key variant or Keychron K6 with some form of Gateron switches.

Keebio Levinson

Keebio Levinson

Ah, at last — the Keebio Nyquist/Levison. This is the current culmination of my interests and keyboard education so far. It's everything I love about the Planck, but split in two and fully customized. Unlike the Planck, the Levinson is not a kit. I ordered the PCB, switch plates, and cases from Keebio. The keycaps are the Big Bang MDA Ortho keycaps, but these are really difficult to find at this point. For this build, I went with Kailh Brown Box switches just to try something new. After acquiring all the parts, I spent a couple hours soldering all the switches to the PCB and assembling the rest of the case! This was so much fun, and it really set me up to do more with soldering in general. After a little practice, it's quite enjoyable.

After assembling the physical pieces of the keyboard, it was time to program it. By default, the Nyquist includes a top row of numbers for a total of five rows. I opted to remove a row to match the Planck layout. After breaking off a row from the PCBs (don't worry, they were designed to easily break off for just this reason), the keyboard magically became a Levinson. The included firmware on the stock keyboard mostly worked, but only the bare minimum. I used an open-source tool called QMK (the graphical web browser version) to program the keyboard. This isn't as intimidating as it sounds since there are pre-made templates for basically any keyboard that's been sold. For me, it was a matter of making some customizations to the different layers, saving it off, and then flashing it to the keyboard. After that, the keyboard was up and running!

Keebio Levinson Desk

I'd love to talk more about the power of using a keyboard that is easily programmable and that contains swappable layers, but that's an entire post of its own. Suffice it to say, you can program your keyboard to do certain things versus relying on your computer to remap keys, etc. This means that no matter what computer you plug into, your keyboard works the same across them all. The power!

Recently, I've been exploring the related hobby of custom-made USB cables. Like QMK, this is an entirely different topic, but one that you can't escape when talking about mechanical keyboards. The cool thing about custom cables is that you have as many options for colors as there are different paracord color combinations, and that's saying a lot.

Cables

Conclusion

If you've stuck with me this far, well done! This probably means you have a slippery slope of keyboard addiction ahead. The important thing is that you're having fun and learning about what you like and dislike along the way. And, if you're lucky, you'll meet some cool people that enjoy the same things.

All the keebs

If you're looking for inspiration or just curious about what other crazy types of keyboards are out there, Instagram is the gateway drug. Beyond that, there are several reddit communities devoted to keyboards, but a good launching point is r/mechanicalkeyboards. Browsing through images, you'll notice that you're attracted to certain things, confused by others, and down-right repulsed by others. Learn about as much as you can! Something that looks silly or weird from the start might turn out to be your next favorite hobby or interest.

Posted on October 14, 2020 and filed under Mechanical Keyboards.

A Brief Introduction to Mechanical Keyboard Switches

(Jeff Abbott is a regular contributor at The Pen Addict. You can find more from Jeff online at Draft Evolution and Twitter.)

A few weeks ago, I started off a series about mechanical keyboards that listed out some similarities between eccentric, customized keyboards and the stationery products that we know and love. In both niche worlds, customization is king, but as you probably know from how overwhelming it can be to navigate the terms and differences between different types of pens, the same is certainly true for mechanical keyboards. One of the most personal (perhaps the most personal?) choices when selecting a keyboard is what switch to use. You might think that all keyboard switches are created equal, but oh, dear reader, would you be ever so wrong. There are so many switches, and they are each unique and special in their own way.

The task of describing each small nuance and esoteric characteristic of all the possible keyboard switches is nearly impossible, but it certainly doesn't make for good reading. With any vast topic, it's always best to start at a high level and follow your interests down their respective rabbit holes. In my mind, I think of switches in relation to two attributes: feel and sound. Similar to a fountain nib preference, this mostly comes down to feel and how you intend to use it.

Feel

First, the feel. Depending on the brand and style of switch, they generally have a "linear" or "tactile" feel. A linear switch has a smooth feel and offers the same amount of resistance the entire way down. A tactile switch has a small bump or variance in resistance as you press the switch down. The bump is usually felt toward the top of the key press, and shouldn't be confused with the hard bump you feel when pressing the key all the way down, or "bottoming out." This graphic has helped me so much over the years when trying to suss out the meaning of all these convoluted terms.

Cherry MX switch types illustration

It's all preference, but a common example that people give is that gamers like linear switches and writers or typists like tactile switches. I'm not sure there's any truth to this, because it all boils down to what feels good to your fingers when typing. What's true for everyone, however, is that you need to try them both to understand the real meaning behind the words "tactile" and "linear."

Personally, I adore a good tactile switch because I enjoy the differing levels of feedback from the switch as I press them down. It also means I can type lighter because my fingers are trained to release the key once I feel the bump, versus bottoming out the key every time.

There are a couple of sub-attributes that contribute to the overall feel of a switch, and they are the actuation force and key travel distance. There are many varying levels of actuation force required for key switches. It boils down to the size and resistance of the spring inside the switch assembly, and it's also a big reason that people like or dislike particular switches. Actuation force is measured in centiNewtons (and sometimes grams), and you'll find anywhere between 30 and 80 cN (and possibly some outside this range) when looking at different switches. If you have a light touch, you'll probably like a lower actuation force! If you tend to pound on the keys even when you're trying to type lightly, you might benefit from a stronger, more resistive switch. Again, most people don't know how to quantify 50cN of force, so it's something you just have to try out for yourself to make sense of.

The key travel distance isn't as much of a thing since most switches have roughly the same travel of 4 - 4.5mm. There are a few low-profile switches that reduce that travel to around 3mm, but they're not particularly common at this point.

Sound

Moving on to the next attribute, the sound that a switch creates is also highly personal, and usually becomes a factor of preference to anyone nearby as well.

All keyboards make some level of noise since they are moving physical objects. There's not really a truly silent keyboard out there, though some get pretty close. Your typical $10 keyboard from a big box retailer makes noise, and it's not a mechanical keyboard. What I'm describing in terms of mechanical keyboard switches is what manufacturers usually call "clicky" switches. Like the name implies, there's an extra bit of engineering in the switch that creates an audible click with every actuation. The level of volume that the click creates varies between manufacturers and switches, from soft clicks to loud ones that sound like a small machine gun firing when someone is rapidly typing. Clicky switches aren't normally well-suited to office environments or for use in close proximity to a significant other. It can get annoying. But to the person using the keyboard, it can be oh so satisfying. To me, the clicky switches bring back a nostalgia and single-minded focus of working on an old mechanical typewriter. Each letter carries so much significance when it's so loud!

As you can imagine, there's so much variety when you take these variables and combine them into one switch. Between tactility, sound, and force, there's no wonder there are so many different switches to choose from. Luckily, you can keep it simple in the beginning.

What do these colors mean?

If you search for mechanical keyboards on Amazon, for example, you'll notice that there's usually a color in the description for the keys used. Blue, Red, Blue, Green, Black...what does it all mean?? These colors describe a specific style of switch that the switch manufacturer offers. By far, the most common switch manufacturer is Cherry MX. Since Cherry has been around so long, they have set the standards in many ways, so let's use them as an example.

Speaking in terms of a Cherry MX switch, here are the most common types you'll see for sale in a keyboard, along with a quick description:

  • Cherry MX Brown: Tactile, non-clicky, 45cN
  • Cherry MX Red: Linear, non-clicky, 45cN
  • Cherry MX Blue: Tactile, clicky, 50cN
  • Cherry MX Black: Linear, non-clicky, 60cN

As you can see, a Cherry MX Brown switch has a tactile bump without an audible click. At 45cN, it's also a fairly light switch to press. In my case, this means I can type extremely quickly without my fingers getting tired because of how easy these switches are to press. On the other hand, the Black switch is much stiffer to press, which may be better for other uses or for heavy typers. Of the four examples, only the Blue switch is clicky, producing an audible click with every press.

For the nostalgic typewriter sound, Cherry MX Blue is the one you want. For a solid linear switch with no bump and no click, the Red is a great choice. And for something in between, the Brown is excellent.

These are just four examples of switches from one manufacturer, and the list goes on and on for all the various combinations.

I've mentioned Cherry now, so what about all these other manufacturers I keep alluding to? Well, for the most part, they mimic the Cherry MX switches, which makes it easier to keep track of what the colors mean. One of my favorite imitations is the Gateron line. The keys don't feel the exact same as the real thing, but they have great quality at a lower price. Same is true of Kailh, and many others. Here's a quick list of manufacturers that offer Cherry-like switches to help you understand as you peruse Amazon and other retailers:

  • Gateron
  • Kailh
  • Greetech
  • Outemu
  • Zeal

Aside from Cherry and its imitators, there are a few other switch manufacturers to mention. Notably, ALPS, Matias, and Topre. ALPS is no longer in business, so you'll only find these in vintage keyboards. Matias is a Canadian company that produces an ALPS switch clone that is pretty close to the original. And then Topre is a completely different ball game that I'm not prepared to get into just yet. From Japan, they manufacture a capacitive switch that doesn't rely on a circuit being closed inside the switch. They have a unique sound all to their own, but they are some of the most expensive switches out of the whole bunch.

And, to be fair, there are also key switches developed by gaming brands as well, such as Logitech, Razer, and Corsair, but you generally can't buy those switches directly and they're only used in first-party products.

Seriously, how can it take so long to describe a switch?

Like I said earlier, you can easily fall into the deep end when it comes to categorizing mechanical keyboard switches. When it gets overwhelming, always come back to my main ethos of mechanical keyboards: feel and sound.

Now that I've rambled on about all the different switches and what they mean, let's take a look at a few examples.

First off, let's go with the Cherry MX Browns!

Next, let's have a listen to the famous Cherry MX Blues:

And finally, here are the Cherry MX Reds:

Bonus round! Here's a video that includes a comparison of all three:

As you can hear, none of these switches are silent, but they definitely sound different. If you're interested in more varieties, YouTube can be a vast resource for finding sound samples across various keyboards.

How on earth do I decide what to buy?

Mechanical keyboards aren't cheap, and most normal people don't need more than one or two (the same can be said about fountain pens, right?). It's not really possible in most cases to spend hundreds of dollars on different keyboards just to find out what you like best.

Don't worry — that's why switch testers exist! A switch tester is a convenient little pack of single switches that include keycaps and a little board to pop them into in order to experience what they feel like in a full keyboard. This is a fantastic way to try out a multitude of switches before spending any money on a complete keyboard. Spending $15 to $50 (depending on how much variety you want) on a non-functional novelty seems like a lot of money, but they're incredibly helpful when trying to narrow down what keyboard you want to buy. When a keyboard costs upwards of $80, it's a good idea to do a little research. Plus, switch testers make great desk decorations and fidget toys.

Just like fountain pens, paper, and gel pens, the world of mechanical keyboard switches is diverse and deep — and we haven't even gotten to the other cool stuff, like keycaps, cases, and LEDs! In my mind, the switch makes up the soul of the keyboard and contributes the most to the way it feels when typing. It's something that takes a little time to discover what works best for you, but it's worth the journey if this sort of thing interests you.

(Disclaimer: This post contains affiliate links. By purchasing through these links, I may receive a small commission, which goes to support myself and The Pen Addict.)


Enjoy reading The Pen Addict? Then consider becoming a member to receive additional weekly content, giveaways, and discounts in The Pen Addict shop. Plus, you support me and the site directly, for which I am very grateful.

Membership starts at just $5/month, with a discounted annual option available. To find out more about membership click here and join us!

Posted on March 11, 2020 and filed under Mechanical Keyboards.